
My second three tiered cake and first time really working with fondant other than one small practice cake was a success! I made the cake for my friend's daughter's first birthday party, which was farm animal themed, so it was a lot of fun. She showed me some example cakes and explained what she wanted, so all I had to do was execute her vision. I think it came out much cuter than the inspiration cakes, if I do say so myself! :)

The finished cake, at my house before transporting.
The Process
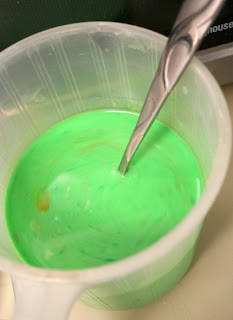
Fondant

This is all the finished fondant after coloring.. it doesn't look like much, but this is really a lot of fondant and took at least 4 batches to make spread over 2 days because of all the work.
15 oz. mini marshmallows
2 Tblsp water
1/2 tsp salt
2 tsp lemon juice and/or a little lemon extract (optional)
1 tsp vanilla (optional)
2 tsp light corn syrup (helps w/ pliability)
2 lbs (approx 7 C) confectioner's sugar
1/2 C Crisco or vegetable shortening
Get a very large bowl ready and grease it lightly with crisco. Pour in some of the powdered sugar to cover the bottom of the bowl.
Double boiler method (can also microwave instead): Spray a large pan (that can sit on top of another pan) with pam. Sit the pan on top of another pan filled halfway with water and heat on high. Add the water and marshmallows to the top pan.
Grease a wooden or heat proof spoon. Stir the marshmallows occasionally, and heat until the marshmallows are melted. Mixture should be soupy.
Add the corn syrup, salt, and any flavorings and stir well.
Dump the melted mixture in the bowl on top of the powdered sugar, then add more powdered sugar.
Grease your hands well with Crisco and knead the mixture in the bowl (be careful of the heat).
Add more of the sugar and continue to knead until it all comes together and is a bit less sticky.
It takes quite a while to work all of the sugar into the marshmallows.
It takes quite a while to work all of the sugar into the marshmallows.
Shape the fondant into a mound and put a light coating of crisco on the outside of the ball.
Wrap the fondant ball in plastic wrap, and store it in a ziplock bag. Press the air out of bag and seal it.
Allow fondant to rest overnight if possible, but it can be used after sitting for a few hours.
I put mine in the refrigerator, but do not refrigerate or put plastic wrap on it after the fondant is on the cake, because it will sweat.
For some batches, I didn't use any lemon, and I couldn't really notice a difference, but it is supposed to cut down on the sweetness.
I'm still not really sure how much of this covers which size cake, because I made so much and ended up with so much leftover.
For the black fondant, I added a lot of cocoa powder before adding the black food coloring. The chocolate also cut the sweetness, and I thought that color tasted really great.
Marshmallow fondant is amazing stuff; it cost about $10 to make all of the huge amounts I made (more than needed for this cake), and a small block of the store bought fondant is that much at Michael's. The best part is that it does not taste like the fondant that the stores sell. I don't even like marshmallows, but I think this stuff tastes pretty good. The texture is still a little weird to eat on cake, and it is very sweet, so often I still pull it off, but I don't mind eating it.
The work and mess required to make it was worth it in the end. I will be doing this again any time I want to use fondant.
Frosting
Next up was making the frosting.
Frosting (originally from Buttercream 1)
Ingredients:
2 sticks (1 cup) butter, room temperature
2 cups Crisco shortening
1/2 teaspoon salt
1 teaspoon butter flavoring (Wilton’s)
1 teaspoon vanilla extract (if using clear, I still add another 1/2 tsp real)
1/2 teaspoon almond extract
2 pounds powdered (confectioners') cane sugar, divided*
1 tablespoon meringue powder (optional but the texture will be smoother)**
milk as necessary for consistency
For frosting, I think I started with 2 batches which I split in 3 groups to have some pink, green, and white frosting.
Then I made another 1/4 batch because I turned too much of it pink and needed more to make green for the grass detail. I ended up with extra of all the colors, but not too much.
Cake Baking

All the ingredients required, in my tiny kitchen. Yes, this is basically all the counter space I have.
Milk, egg, extracts, and coloring waiting to go in the batter.

The batter after adding butter and oil, but before the really wet stuff.
I looked at so many white cake recipes, I can't seem to find the link to the one that is closest to what I ended up doing. It was on a blog where the blogger tested 2 white cake recipes and then made a third that was a combo of the 2. I ended up doing the combo, except I used 2 eggs and 2 egg whites rather than all egg white.
White Cake
Ingredients:
2 1/4 c. cake flour
1 c. + 2 tbsp whole milk, room temp
2 eggs and 2 egg whites, room temp
1/2 tsp almond extract
1.5 tsp vanilla extract
1½ c + 2tbsp granulated sugar
4 tsp baking powder
1 tsp salt
1/2 cup (1 stick) unsalted butter, softened
1/4 c canola oil
-Preheat oven to 350 degrees and prepare two 9-inch cake pans (I line the bottom of the pans with parchment paper).
-In a medium bowl, combine milk, eggs and extracts. Stir, and set aside.
-In the bowl of stand mixer, combine flour, sugar, baking powder and salt, and stir.
-With mixer on slow speed, add pieces of butter and then slowly add oil,
beating just until mixture resembles moist crumbs.
-Add a little over half of the milk mixture and beat to combine.
-Turn mixer speed to high and beat for one full minute.
-Slow the mixer down, add remaining milk mixture and beat on high for an additional 30 seconds.
-Pour the batter into cake pans and bake 20-25 minutes
I used 1/2 a recipe split between the two 6" layers (baked for 22 minutes, but these pans were heavier weight than the others), the whole recipe split between two 9" layers (baked for 22 minutes), and the whole recipe for each 12" layer (baked for 29 minutes). It turned out that the 6" layer was a bit taller than the others, so a little less than half a recipe would be better for uniformity.
Also, for the 9" tier, I added more vanilla extract instead of adding any almond extract, and I scooped out a cup of batter and winged it on making it dark brown for a "marble that wasn't supposed to really marble" layer. I added cocoa powder, black food coloring, powdered sugar, and then some more milk, flour, and baking powder I didn't measure, because I was afraid the cocoa was throwing things off, plus I wanted the layers to be as full as possible (and they definitely were for my pans!). I tried dropping the chocolate batter into large blobs, so it would not be "marbly" but more like cow spots, but it blended way too much and mostly ended up looking like a chocolate cake. I should have used less chocolate batter. But I thought this tier tasted really good and was super moist.
To make the pink cake, I added 20 drops of neon pink liquid food coloring, and for the green, each batch had 25 drops of regular green and 20 drops of neon green.
I also used wet cake wraps for all the cakes to help them cook evenly. All my cakes were very level except for the marble, because the consistency of the 2 types of batter was different, but it came out ok after the frosting (I didn't level them because this tier was already the shortest one).

Green cake after it's baked (before taking off parchment paper).
Cake Decorating

Each cake after frosting.

Minor disaster I noticed right as I was putting on the fondant on the bottom layer.. .my brand new Wilton cake plate had cracked in 2 spots from just the weight of this one cake. I hadn't even picked it up!! I could not believe that, but we managed to support it with another plate that my mom went out to buy.

Cakes after fondant.


Cow spotted layer.

The bottom was my favorite, because it was fun making the fence. For the heck of it, I cut out the happy birthday letters by hand from all the excess pink fondant. This kind of worked out because I was a little off when I flipped the green cake onto the plate, and it was offset to one side. More room for letters! LOL.

Closeup! I wasn't sure what to do for trim on the top 2 layers, and I started with just white dots on the cow before I thought of alternating with black. I think that turned out really cute! I went with all pink on the pig, so it didn't distract from the face.


Cost
This cake cost about $30 to make. It was hard to know exactly because some of the ingredients like extracts and food coloring I already had and/or only used part of, etc. If you had to buy everything required, the starting cost would be a lot more, but you would also have a lot of things leftover for future use.
But the breakdown was roughly even with frosting, fondant, and cake all about $10 each. I did price check between Publix, Walmart, and Target and found the best prices for the big ingredients, and I used store brand for sugar, powdered sugar, butter, oil, eggs, and milk.
Things learned from making a 3 tiered fondant covered cake
- It's definitely worth it to make your own marshmallow fondant instead of store bought, but give yourself another hour per batch to make it, kneed it, and clean up the mess.
- I discovered my oven is about 20 degrees hotter than it says and that lowering the rack a level helped things out.
- Working with fondant is much easier if you have super short finger nails because nail marks do not come out of fondant unless you re-kneed the whole mess.
- Trying to use fondant smashed on your fingertips, inside some gloves will help for a minute, but then it will become a watery, melted mess.
- There's no need to go to the gym that week, because your forearms will get an amazing workout from all the fondant kneeding and rolling, as well as carrying the super heavy cake.
- Not as much fondant will be needed as you'd think.
- Smoothing fondant over a 12 inch cake is really not difficult; I was intimidated about it for nothing.
- A pizza cutter works great for trimming excess fondant after covering cake, but make sure you don't cut too much. I ended up a little short on some spots.
- If you're making a cake topper, buy Gum-Tex to add to the fondant, and make it more than 2 days ahead of time and/or use a fan to help dry it.
- Watch out with chocolate fondant, as it leaves more residue on your hands, so if you are putting it on a white base, be careful not to touch the white after the black, or you will leave smudges.
- When making small fondant animals, use one piece to mold all parts if they are the same color, and try to avoid sticking on ears/tails because they will come off, even when you try to use frosting to hold them on.
- Cake Boss is a liar - rice krispy treats will not solve your problems.
- Do not trust a Wilton 16" separator plate to hold even one tier of cake without cracking.
- Use a (gripping) shelf liner under the cake plate, then put the cake plate in a box, and use more liner under the box for car travel to save your sanity.
I guess that's about it!
Great job Christi! You've really done a great job documenting the process :) I enjoyed reading it!
ReplyDeleteGot this from pinterest. My daughter's party is not till September but you have encouraged me. Your cake turned out great!! Do you have a picture of the animals you added?
ReplyDelete